Much of the time, the Live Client for Unreal (Developed by Glassbox) plugin is used to drive blend shapes. However certain characters require the use of Bones or Joints. In order to work with Bones we will need to make use of Unreal Engine’s Animation Blueprints.
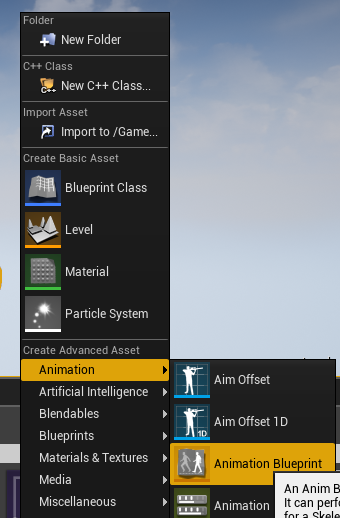
To create a new Animation Blueprint, right click in the empty space of your content browser to find the Create Advanced Asset menu:
Under Create Advanced Asset you'll choose Animation, then Animation Blueprint.
Choose AnimInstance as your Parent Class and the Skeleton of your character:
Press 'OK' and name your new Animation Blueprint whatever you feel is appropriate.
Now you'll select your Actor in the main viewport and head to the details panel where you'll tell this particular actor to use an Animation Blueprint and point it to the one you've just created in the Anim Class section:
Your character is now primed to use the Animation Blueprint for driving joints. Next we're going to edit the Animation Blueprint. Once open, you'll navigate to your Animation Blueprint's Event Graph and set up the following nodes:

What this is doing is looking for the Faceware Live component that is a component of your Character Blueprint and using that instance to get it's data.
You could potentially set up your entire character blueprint directly within the Animation Blueprint, but due to the nature of the ownership hierarchy, we generally recommend you do as much as you can inside the character blueprint as some nodes won't be available to the Animation Blueprint.
From here you will create rotator variables for any joint rotations you want to perform. In Victor's case here, we're rotating the head, as well as his eyes:
This looks more intimidating than it is. If you follow the pints from Eyes Look Down and Eyes Look Up you can see that we're converting the float values, 0.0 to 1.0, that are coming from Live Server into degrees by multiplying them. For Eyes Up that's a simple float x float node, multiplying it by 25. We’ve chosen 25 because that was the most appealing range for our particular character on the Up/Down axis for the eyes.
Then we multiply Eyes Down by -25, and we add the two together. We then use the Make Rotator node to convert the float value into a rotational value, and we set that to a variable called 'Eye Rotation'.
From here, you'll open the Anim Graph of your Animation Blueprint:
We're using a simple 'Get Eye Rotation' to get the current value of that variable, and we're plugging it into a Transform (Modify) Bone node. From there we plug into our Final Animation Pose. You can string these Transform Bone nodes together from their output pin into the component pose of the next node in the chain.
To set a Transform (Modify) Bone node up to drive the proper bone, check the details panel:
Choose your Bone, choose select the checkbox next to Rotation, and pick your options. Generally speaking you'll want to work in the Component Space and you'll want to Add to Existing, but there are some odd use cases where you may want to different options, dictated by your use case.
Now you are all set. Make sure your blueprint is compiled and press play!


